Vinyl wraps have become a popular way to personalize and protect surfaces, and Pink Vinyl Wraps, in particular, are a favorite for adding a bold, stylish, and unique touch. Whether you're looking to transform your car, laptop, furniture, or any other surface, a pink vinyl wrap can make a striking statement. This guide will walk you through the essentials of DIY projects using pink vinyl wraps, helping you achieve professional-looking results without breaking the bank.
Choosing the Right Vinyl Wrap
Before diving in, it's important to select the right type of vinyl wrap. High-quality vinyl is easier to work with and more durable. Look for wraps that are self-adhesive and come with air-release technology to avoid bubbles during application. Matte, gloss, and metallic finishes are all available in pink, so choose one that complements your style and project.
Essential Tools
To ensure a smooth application process, gather the following tools:
- "Squeegee": For smoothing out the vinyl and removing air bubbles.
- "Utility Knife": For trimming excess vinyl.
- "Heat Gun or Hair Dryer": To make the vinyl more pliable and help it adhere to curved surfaces.
- "Measuring Tape": For precise measurements.
- "Cleaning Supplies": To ensure the surface is clean and free of dust or grease before application.
Preparing the Surface
Preparation is key to a successful vinyl wrap application. Start by thoroughly cleaning the surface with soap and water or an isopropyl alcohol solution. This removes dirt, grease, and any residue that could interfere with adhesion. For larger projects like cars or furniture, ensure the surface is completely dry before proceeding.Candy Car Wrap
Applying the Pink Vinyl Wrap
1. "Measure and Cut": Measure the surface you're wrapping and cut the vinyl to size, leaving a few extra inches on all sides for adjustments.
2. "Peel and Stick": Peel back a small section of the vinyl's backing and position it on the surface. Gradually peel away more backing as you press the vinyl onto the surface using your squeegee.
3. "Smooth Out Bubbles": Use the squeegee to remove air bubbles as you go. Start from the center and work outward in small sections.
4. "Heat for Curves": If wrapping around curves or edges, use a heat gun or hair dryer to soften the vinyl, making it easier to stretch and mold into place.
5. "Trim Excess Vinyl": Once the vinyl is fully applied, use a utility knife to carefully trim away any excess material along edges or seams.
Tips for Success
- Work in a clean, dust-free environment to avoid debris sticking to the adhesive side of the vinyl.
- Take your time—rushing can lead to wrinkles or misalignment.
- Practice on smaller items before tackling larger projects like cars or furniture.
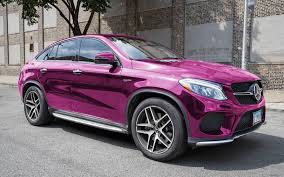
Why Choose Pink Vinyl Wraps?
Pink vinyl wraps are perfect for those who want to stand out or add a playful, feminine touch to their belongings. From bold neon pinks to soft pastel shades, there's a hue to suit every taste. Whether you're upgrading your car's exterior or giving your phone case a makeover, pink vinyl wraps can transform ordinary items into eye-catching pieces of art.
With a little patience and practice, DIY pink vinyl wrap projects can be both fun and rewarding. So grab your tools, pick your favorite shade of pink, and start wrapping!
Rated 4.97/5 based on 2500 customer reviews